|
|
|
|
|

|
|
Burst USSR KGB GRU R-353 →
Burst encoder
Proton was a sophisticated electromechanical device for recording and
transmitting pre-coded messages in morse code
at very high speed (typically 250 WPM) in order to avoid
interception
and radio direction finding (RDF).
Such devices are commonly known as burst encoders.
Messages are stored onto magnetic tape by means of a
recording device with
a rotary dial, similar to the dial of an old telephone set,
without the need for electricity.
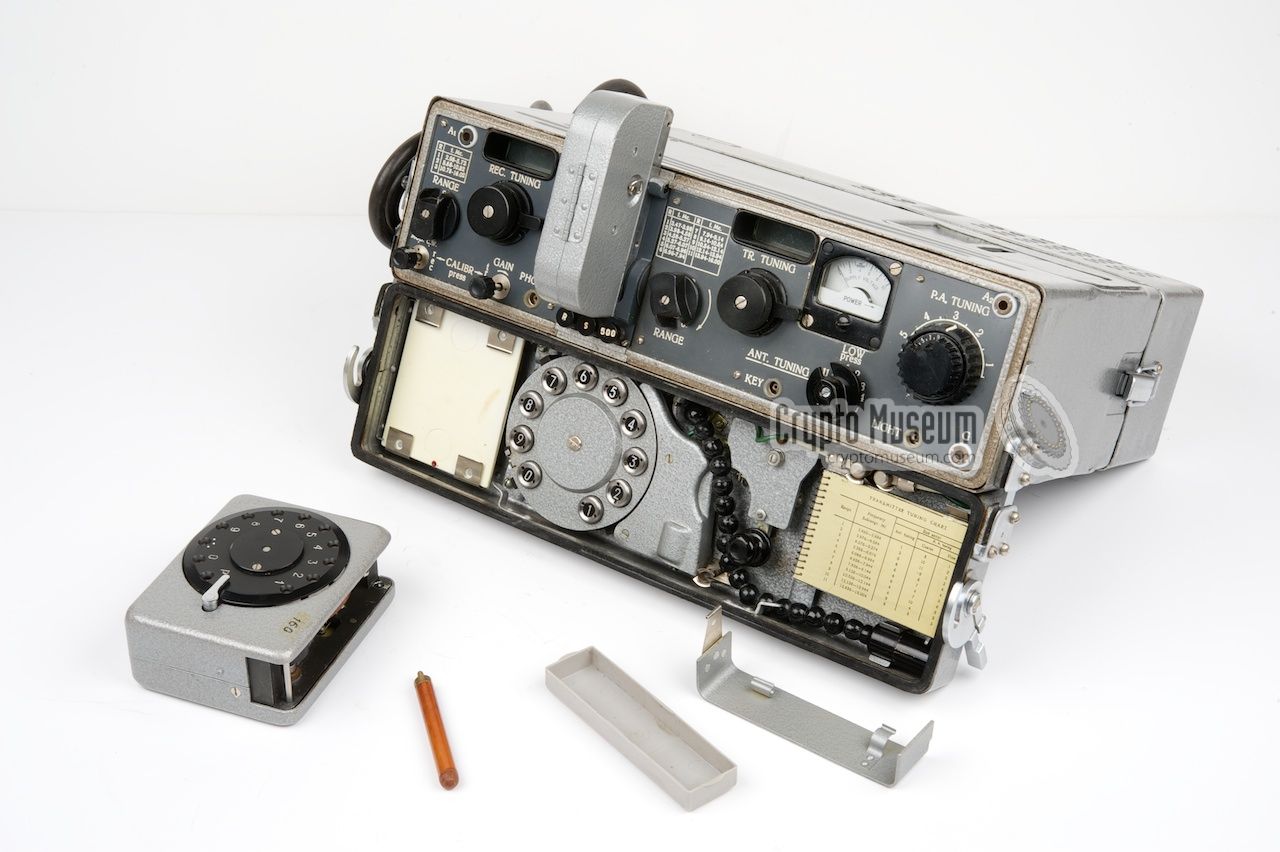
It is only used on the R-353 spy radio set,
which has a built-in automatic keyer on which the the supplied
tape cassettes are played back.
|
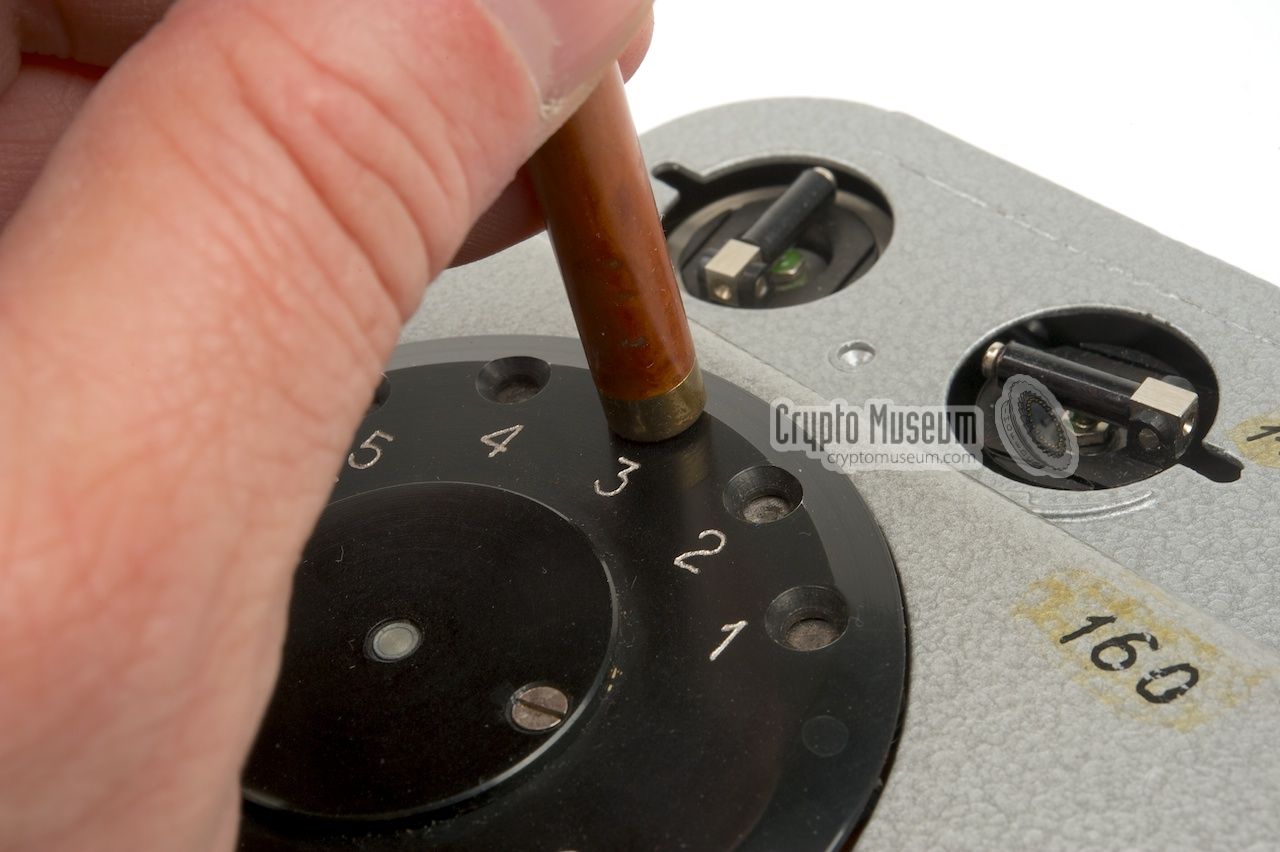
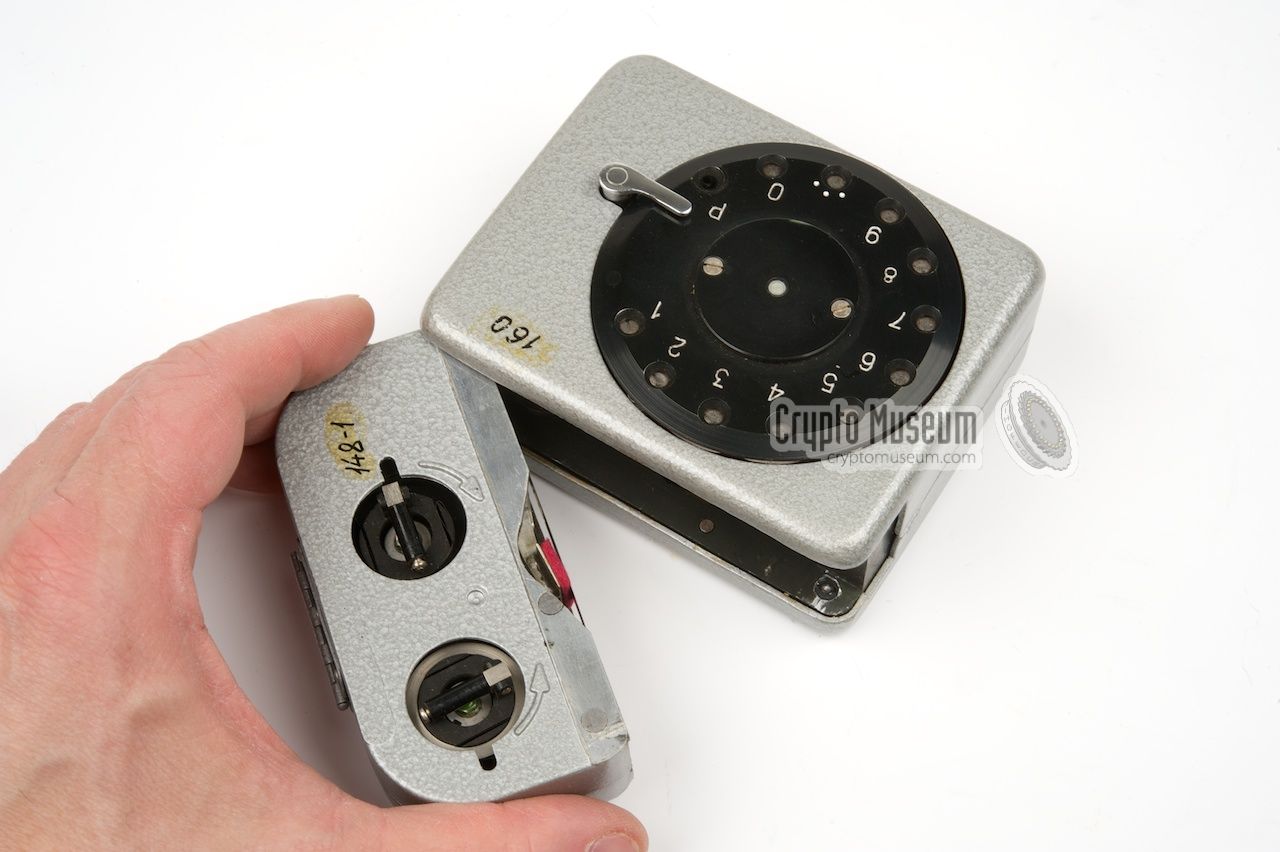
The encoder is housed in a metal hamerite-painted enclosure that measures
10 x 8 x 4 cm. It has a black dial at the top, much like the dial
of an old telephone set, with the number 0-9, the letter P and the
morse correction sign (···). At the right hand side of the dial is a metal
bracket that marks the end-of-dial, known as the stop.
The holes in the dial are too small for a finger.
Most encoders had their serial number written
or engraved in the top right corner.
The image on the right shows an R-353 burst encoder in near-mint condition
with written serial number 160.
|
|
|
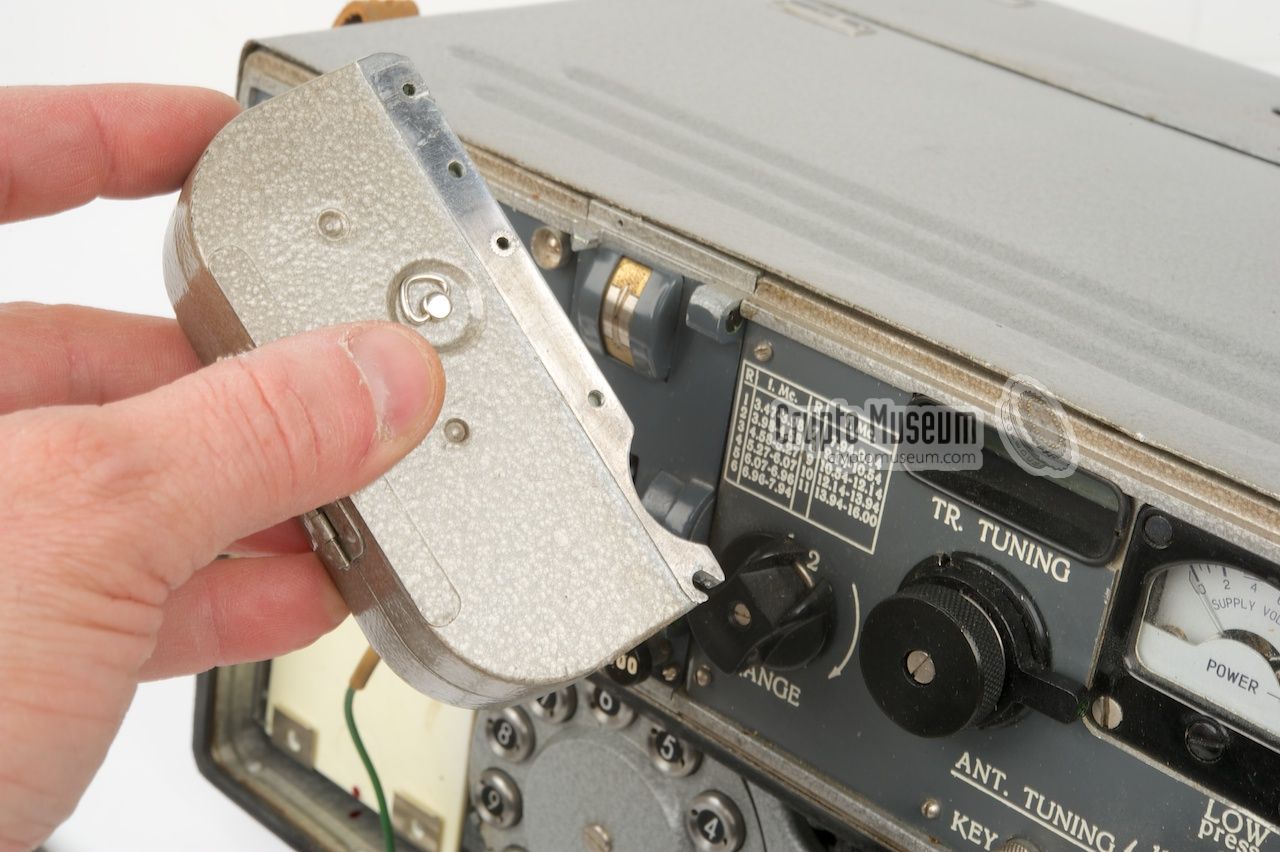
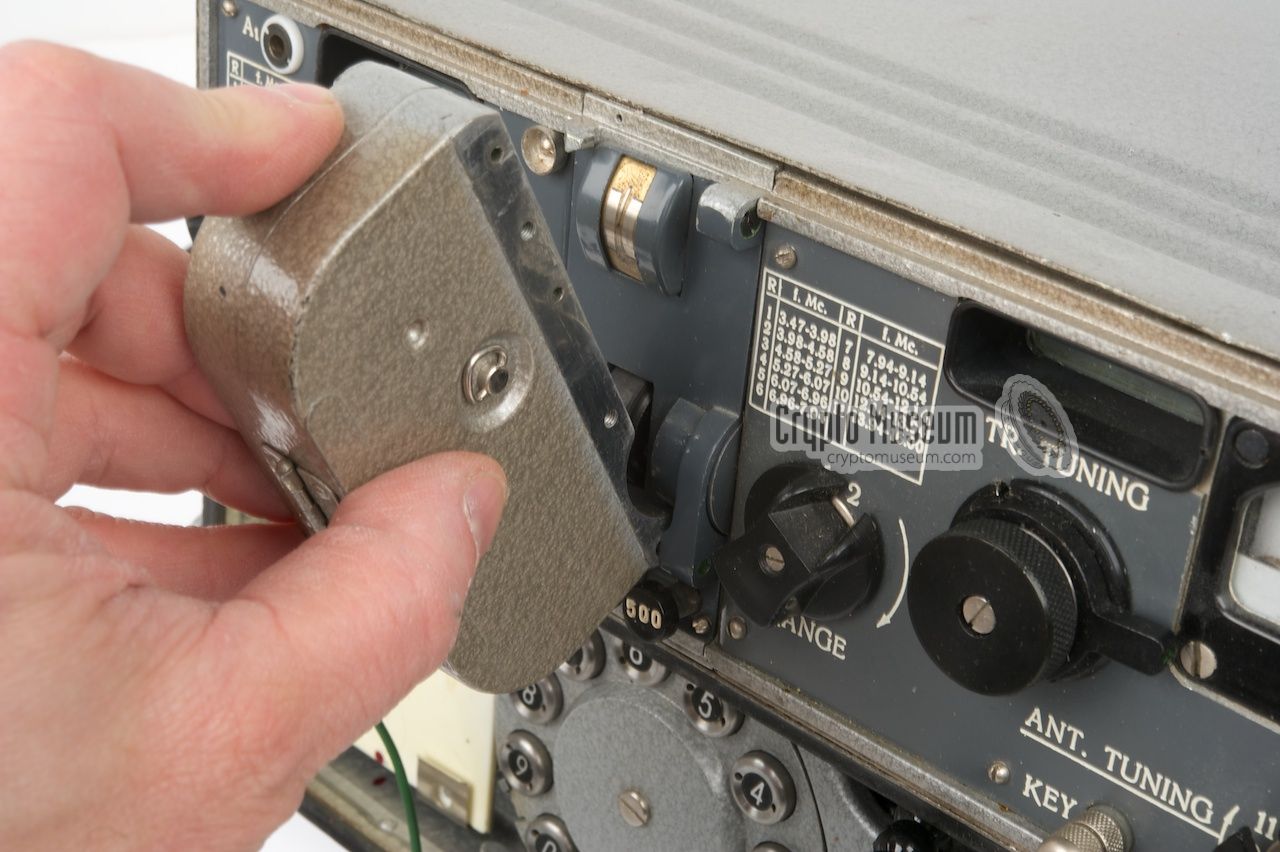
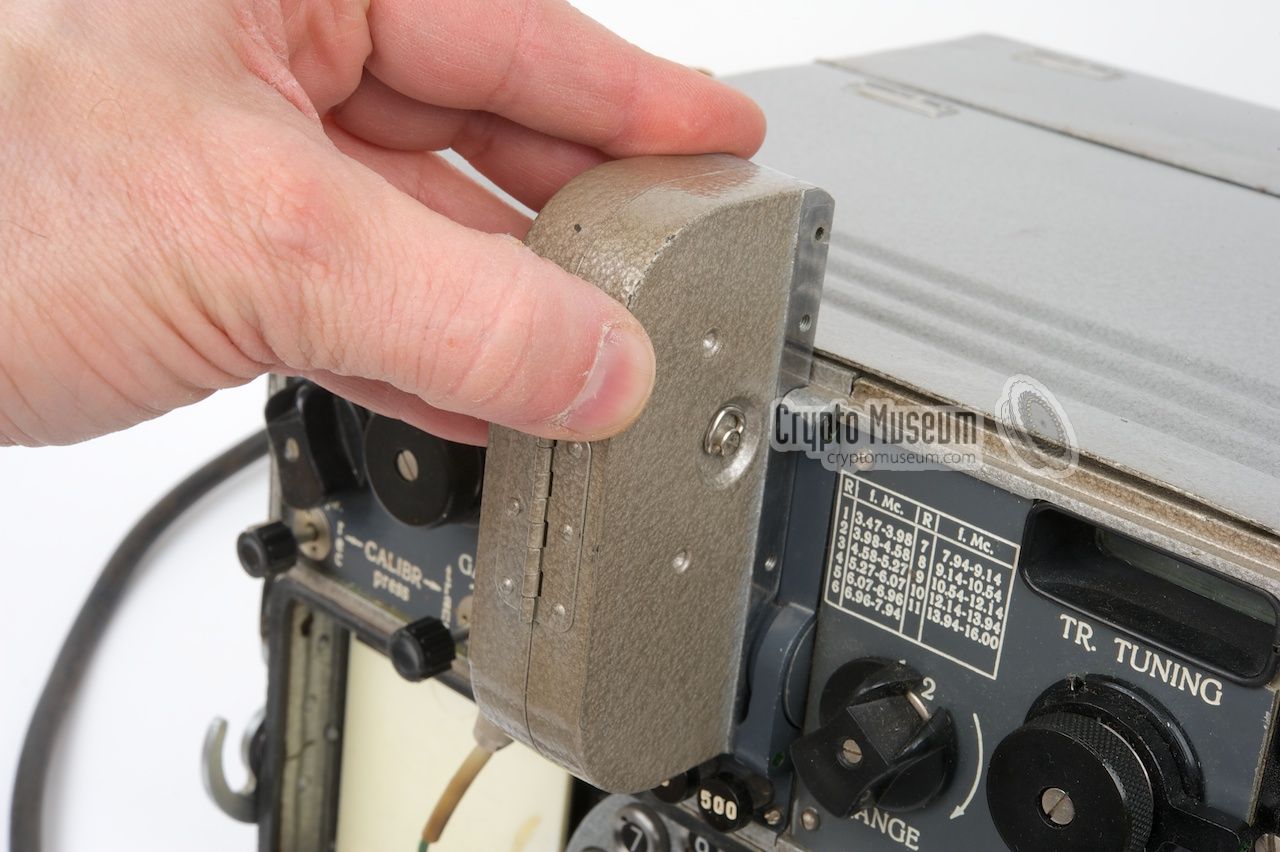
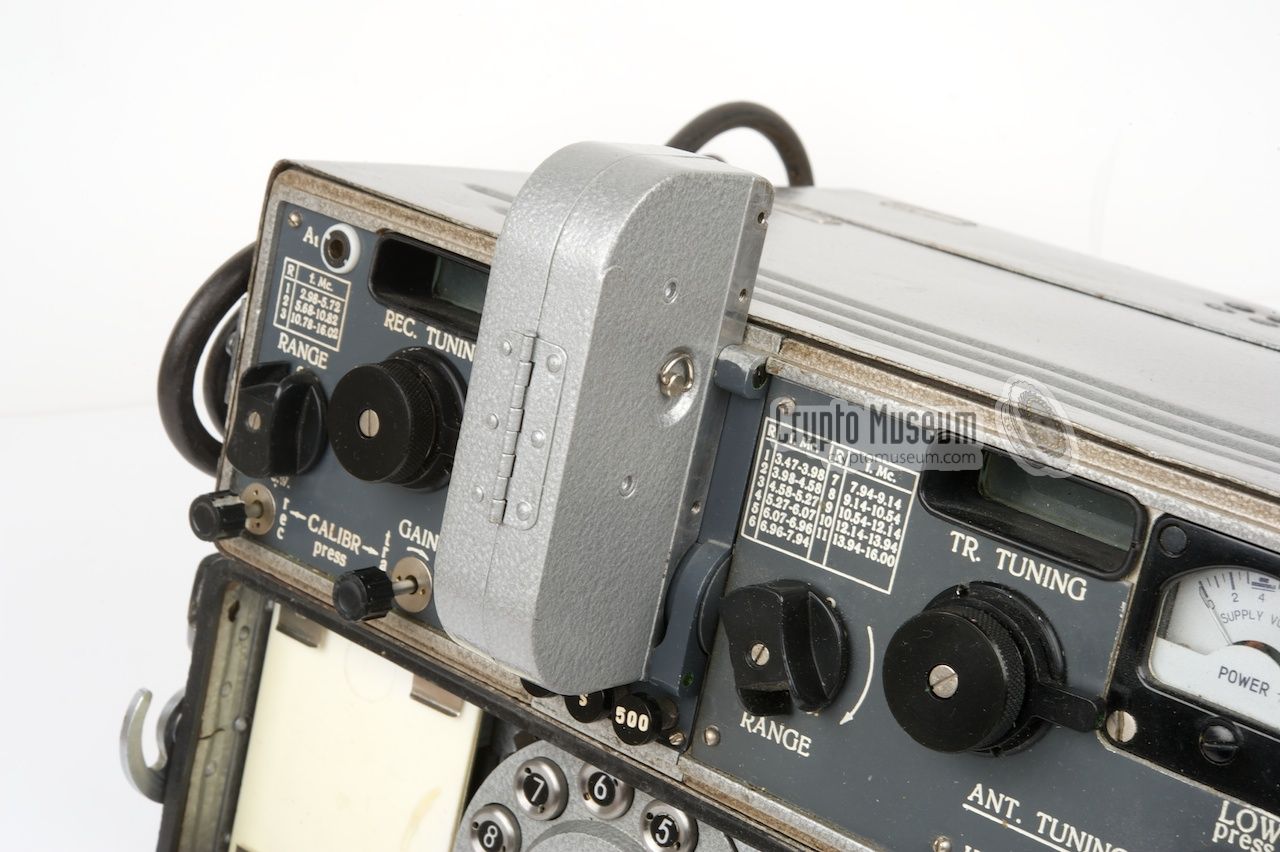
At the rear of the encoder
is a metal panel that can be removed. The panel
gives access to the cassette bay and exposes the interior of the encoder.
Inside the metal panel is a short stylus, or pen, with a metal tip at one end.
It is held in place by two metal clips and can be removed easily.
|
With each burst encoder, one or more cassettes were supplied.
Each cassette measures approx. 9.5 x 4.5 x 2.5 cm and contains two
spools with magnetic tape on them. The tape is supplied by the leftmost
reel and picked up by the one on the right.
So, tape direction is from left to right.
Inside the cassette is a belt-driven friction coupling that ensures a
contant tape-tension and prevents the tape from rolling out of the cassette.
The tape is 6.25 mm wide and each cassette contains approx. 10,6 metres,
enough for storing 300 words (300 groups of 5 digits).
|
|
|
Although the transmitter can be used for an uninterrupted period of
1.5 hours, it is advised to keep the messages as short as possible in order
to minimise the risk of
interception and radio direction finding.
The tapes can be wound forward or reverse by means of the two small fold-out
cranks on top of the reels. It is also possible to rewind the tape on
the transmitter (R-button).
|
|
Coding a message is a quite laborious task. First of all, a textual message
has to be converted to some kind of numbering scheme of which there were
many around. Next the numerical message had to be
encrypted with some cipher,
so that an eavesdropper
would not be able to read it.
|
Although various manual encryption methods
were used by Eastern Block spies and
agents, such as matrix transpositions and
codebooks,
the most common one (also the most feared one)
was the One-Time pad (OTP) cipher.
When used correctly, this cipher is unbreakable.
The OTP was a small booklet with very thin pages, each of which contained
a sequence of random numbers. Only two copies of the OTP existed:
one in the hands of the agent and one at the receiving end. Each page was used only once and was destroyed immediately after use.
|
|
|
The message is encrypted by adding each of the digits on the OTP
to one character of the plaintext. If the OTP consists of truely random
numbers, the result bears no relationship to human-produced text and will
defeat any frequency analysis.
At the receiving end, all that has to be done is subtract the numbers
again to reveal the original message.
One of the disadvantages of the OTP is the
problem of key-distribution: both parties need to have sufficient supply
of OTP sheets.
➤ More information about the OTP
|
|
Recording a message is pretty straightforward. For now we assume that the
textual message has been converted to a numeric one,
possibly encrypted with the unbreakable
One-Time Pad (OTP) cipher.
The message is typically written
down in groups of 5 digits (0-9), separated by spaces.
Before starting a recording, ensure that the tape has been fully rewinded
either manually, using the fold-out cranks on top of the cassette,
or by means of the keyer of the R-353 (see below).
|
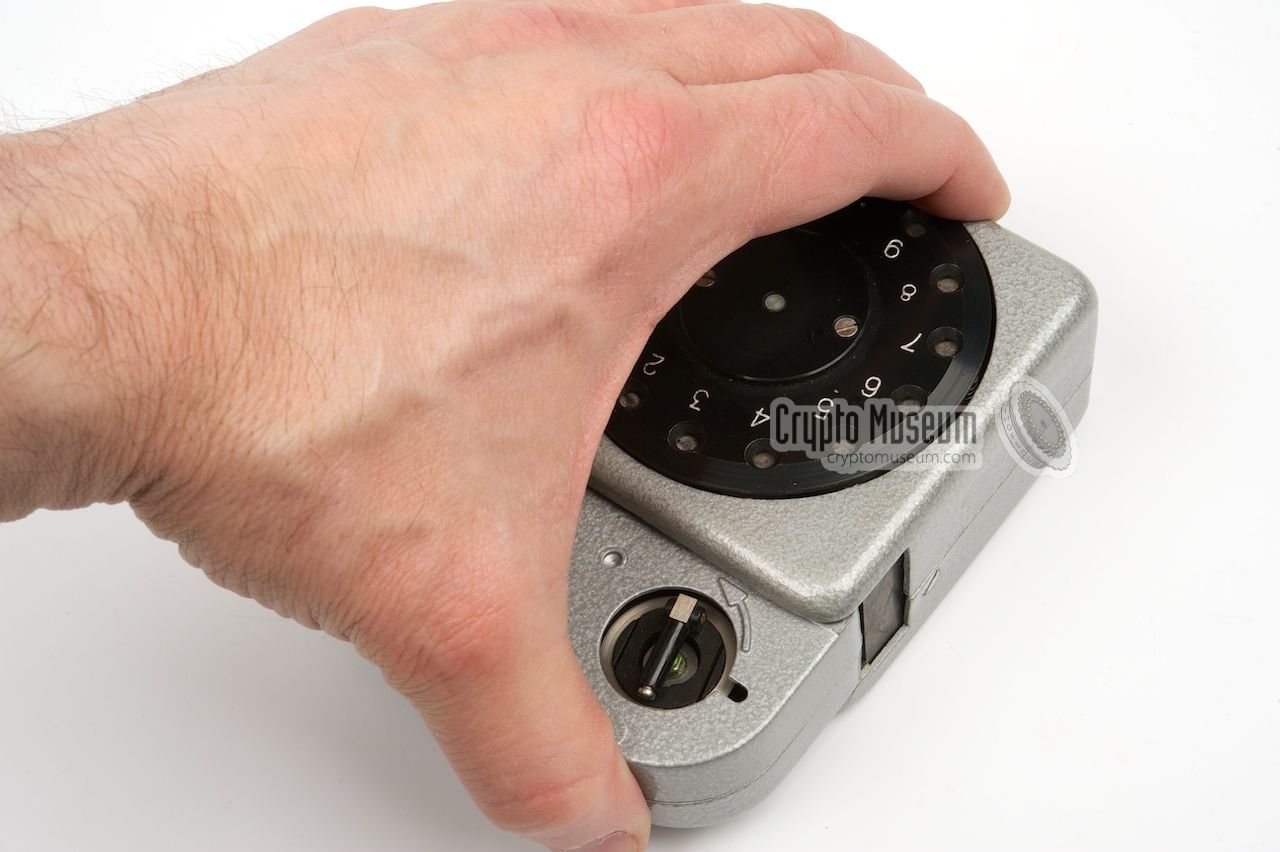
First take away the rear panel
of the encoder and remove the brown pen
that is stored inside that panel. Now
attach the cassette
by 'hinging' it onto the metal axle inside the encoder
and firmly locking it onto the body of the encoder.
The cassette is now attached to the encoder and we can start the recording of
a message. Take the first digit of the message, for example: '3'.
Place the metal tip of the brown pen
in the corresponding hole of the dial (3),
press it fully down and then use it to rotate the dial towards the
stop lever.
You will feel some resistance.
|
|
|
In the last 2 cm before reaching the stop, the tape will be transported.
Once you have reached the stop, do not release the pen but use it to
rotate the dial a little bit further
clockwise. This will move the stop
down a little bit and you will probably hear a 'click'. This is the moment
that the data is actually written on the tape. Repeat this procedure
for every digit in the message. Use P to insert spaces after each 5th digit
(Pause) and use (···) if you have made a mistake.
|
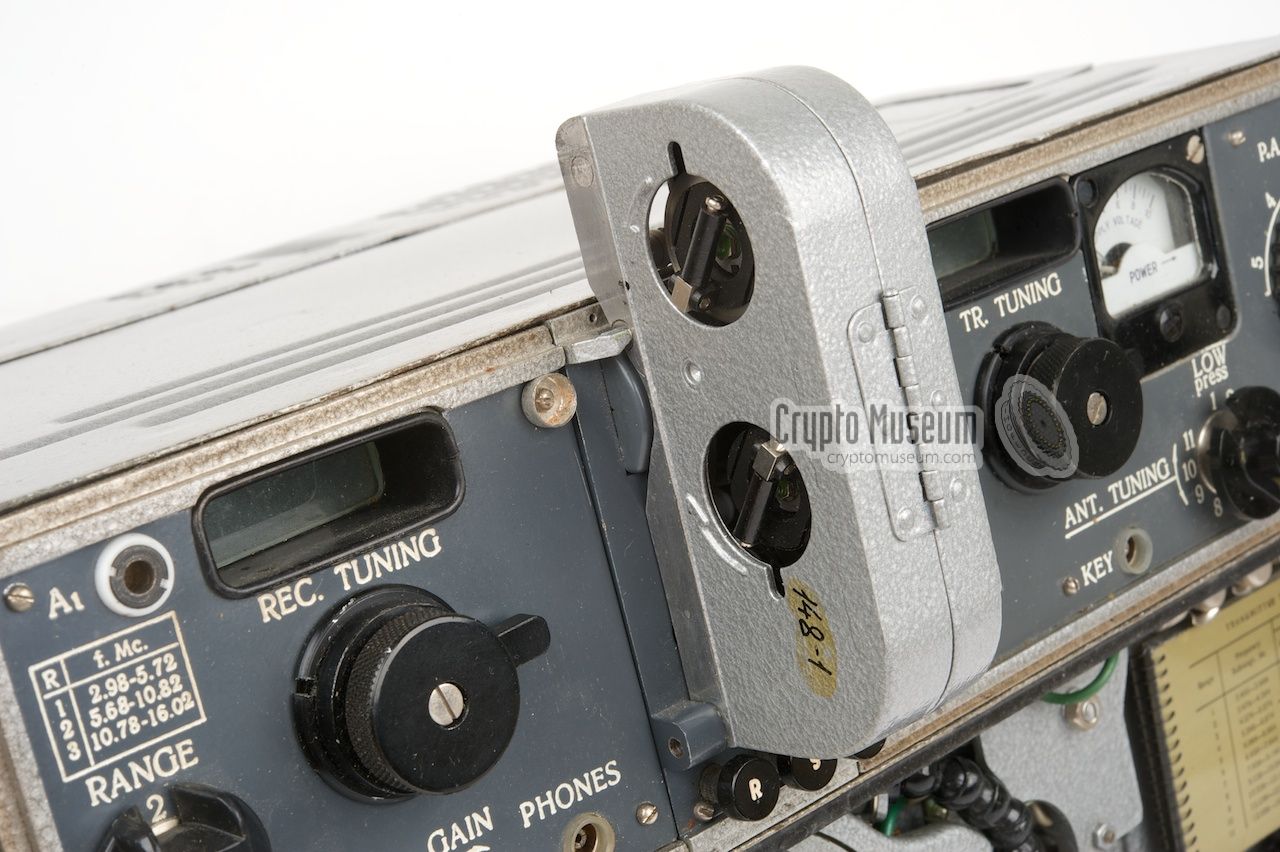
Note that the cassette has to be wound back to the initial position before
the message can be transmitted. This can be done manually,
using the small cranks
on top of the tape reels, or automatically by using the rewind
feature of the high-speed keyer of the R-353 (recommended).
Install the cassette on the keyer by
'hinging' it onto the steel axle at the
bottom of the keyer and locking it in at the top.
A 'click' will tell you that the cassette is installed properly.
You may now rewind the tape by pressing
the R-button (i.e. the leftmost button just below the cassette).
|
|
|
Now follow the normal procedure
for pre-heating the transceiver, calibrating
the frequency scale, selecting the desired frequency and tuning the
transmitter's PA and antenna sections. The button 250 (or 500 on some
models) will pre-heat the transmitter. Once this is done and all circuits
are stable (after approx. 15 minutes), the burst transmission is started by
pressing the S-button.
|
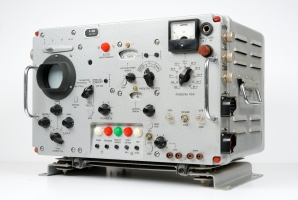
The transmitter now sends an identification signal to the
base station.
If all goes well, the base station returns an answer signal
in the form of a series of dots (······) to acknowledge receipt.
The acknowledge signal will automatically start the high-speed keyer
and the burst transmission will commence.
Depending on the length of the coded message this may take several seconds.
The image on the right shows the R-355
that was used as the main controller
in the USSR (and other Warsaw pact countries) base stations.
|
|
|
Note that you have to rewind the cassette to beginning of the tape,
before it can be used again.
The initial version of the keyer on the R-353 was able to send data
at 250 WPM (groups or words of 5 digits per minute), indicated by the
number 250 on the rightmost button of the keyer.
The speed was increased to 500 WPM on later models, reflected by the
number 500 on that button.
➤ More about the R-355 base station
|
Although the R-353 has a proper built-in receiver, it was typically
not used for the reception of messages (i.e. instructions)
from the base station.
This is because the transceiver was commonly held by the radio operator
and not by the agent. Furthermore, the R-353 was usually hidden in a safe
place and would only be retrieved in case of an emergency.
As everything in espionage is on a need to know basis,
the radio operator does not have to be aware of the agent's instructions.
FUNF DREI SIEBEN ACHT EINS TRENNUNG...
Instead, the agent was often given money to buy a commercial
short wave world receiver
from a local electronics store,
such as the Sony ICF-2001D
and the Zenith 1000-D, on which he
listened to spoken messages from the so-called
Numbers Stations.
These messages contained personal instructions for the agent and were commonly
encrypted with the unbreakable OTP cipher.
➤ More about Numbers Stations
|
|
The R-353, and hence its burst encoder, were used for a
variety of purposes, including Special Forces (SF), diplomatic traffic
and espionage. When used for espionage, for example by a Soviet agent operating
undercover in Western Europe, intelligence and radio were usually
separated.
|
This means that the agent did not necessarily have to transmit the coded
messages himself. Instead he would encrypt it, using an
OTP,
and record it onto magnetic tape
by means of his burst encoder.
The cassette was then hidden in a predetermined secret place, known as
a dead letterbox,
where he picked up a fresh new tape cassette.
This process is known as a dead drop.
After signalling the radio operator, by issuing a previously agreed signal
or marking in a public place,
the latter would visit the dead letterbox, pick up the cassette
and leave a blank new one.
|
|
|
He would then transmit the message to the base station at a predetermined time,
after which he issued a different signal to let the agent know
that this his message had been sent.
The main advantage of this way of working is that the agent is not
exposed when the radio operator is captured by means of surveillance,
betrayal or radio direction finding
(and vice versa of course).
|
|
|
Captured by western intelligence
|
|
|
R-353 transceivers and their burst encoders and OTP booklets have been
captured during the Cold War by Western intelligence agencies on a number
of occassions. One documented example is the capture of a Dutch man, who
acted as an East-German agent in The Netherlands, in 1969.
When he was captured, the Dutch intelligence agency
BVD
(now: AIVD)
found a fully operational R-353 in his home, along with a burst encoder,
cassettes and a partly used OTP booklet
[1].
|
|
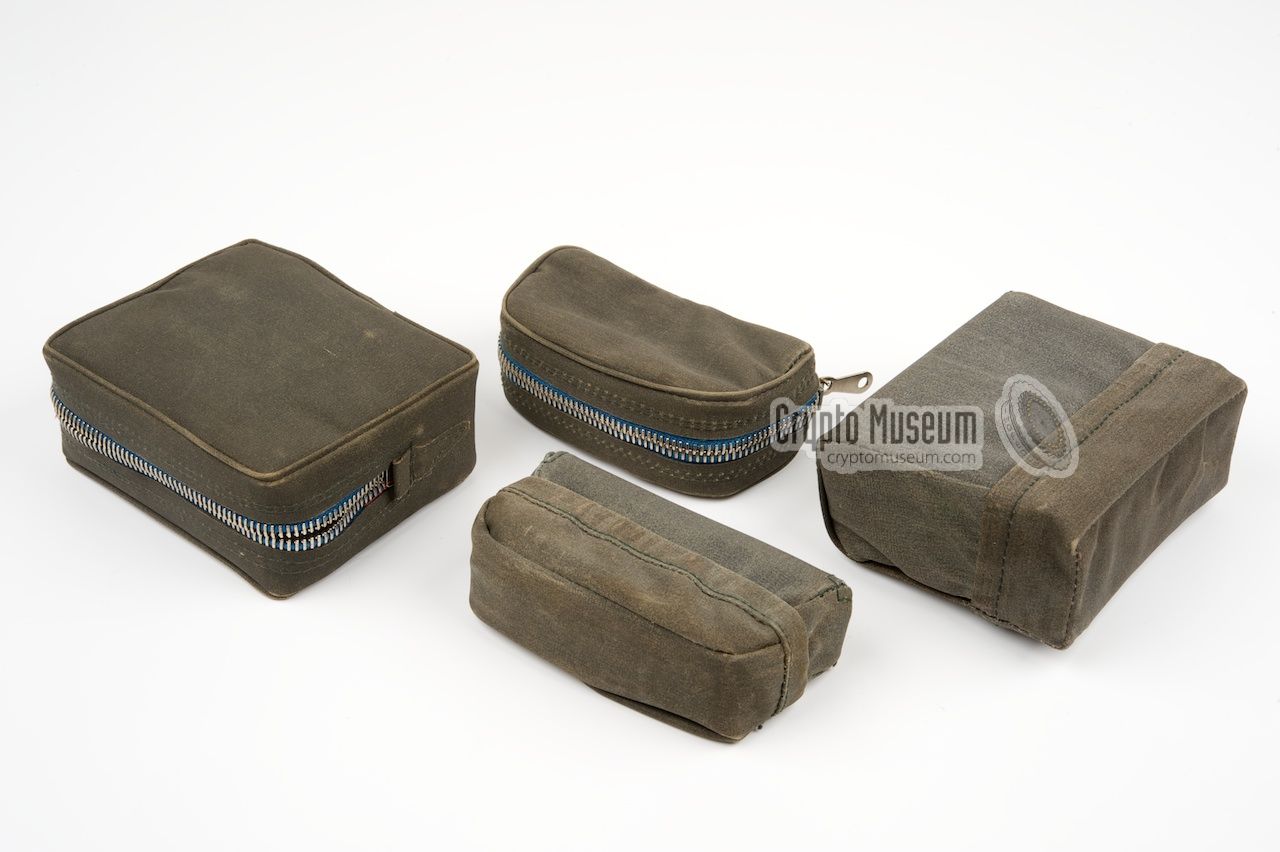
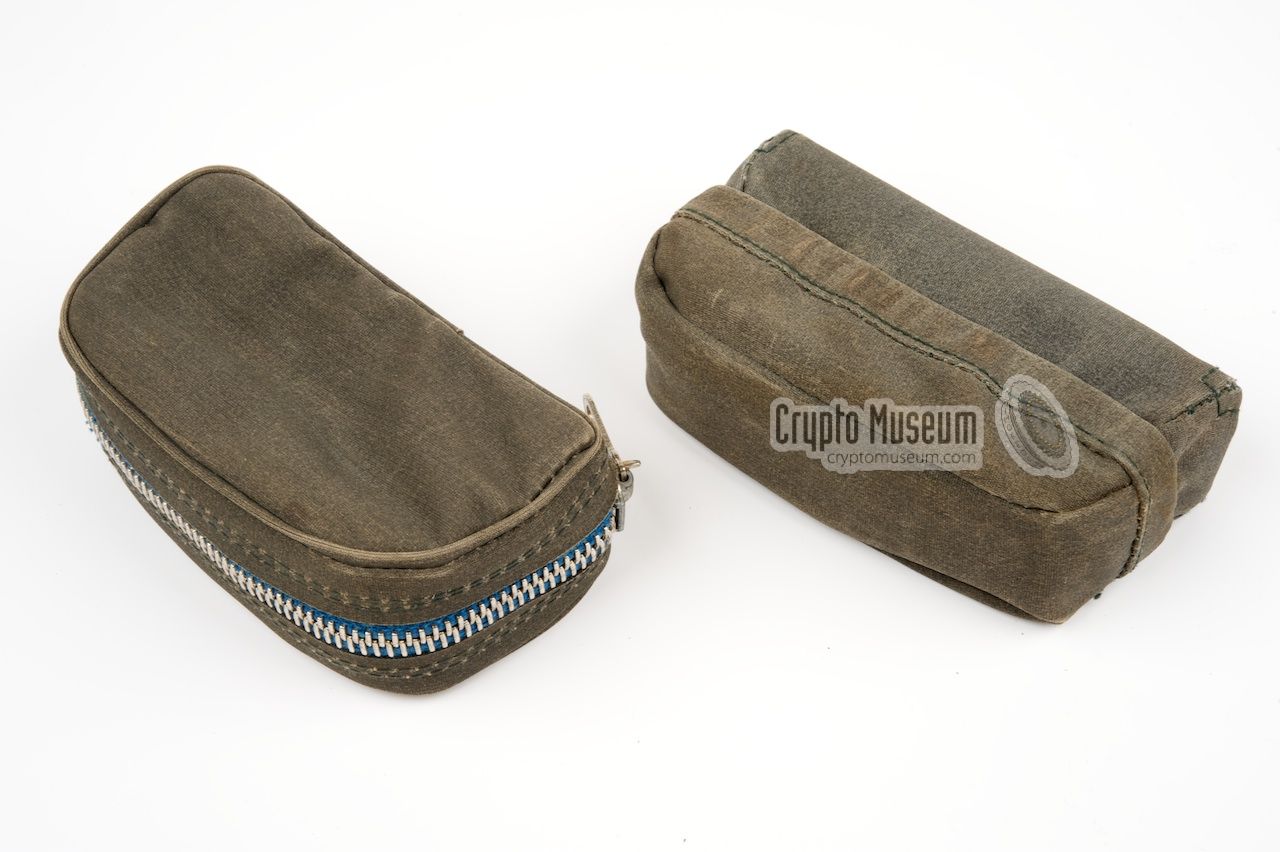
When the burst encoder and/or the cassette was not used it was normally
stowed in some kind of packaging to protect it agains dust, moist and
other potentially hazardous influences. Two types are known to exist:
(1) a wallet-type bag with a zipper and (2) a 'raincoat' with elastic edges.
|
For use in an urban environment, the
zipper bags were probably the
most practical way of storing the devices. However, when the system was
used in the field, e.g. by Special Forces (SF), the
raincoat-type packaging
was recommended as it offered better protection against moist.
When used by SF, 1 encoder and 2 cassettes,
all in raincoats, were stowed in a special pocket
at the side of the canvas R-353 carrying bag.
When used for real espionage,
cassettes would also be carried
around in their raincoats, especially when left behind in a
dead letterbox (or: dead drop).
|
|
|
Note that all cassettes came with a rectangular plastic cap that should be
placed over the open end,
so that the sensitive magnetic tape is properly
protected. Once this plastic cap is in place, like on the cassette in
the image above,
the cassette can safely be transported or stowed away.
|
|
Like most Russian devices of the Cold War era, the R-353 burst encoder
and its tape cassettes are relatively simple yet ingenious systems, that
do not require any external energy source, apart from human labour.
They are very robust, service friendly and require only basic maintenance.
|
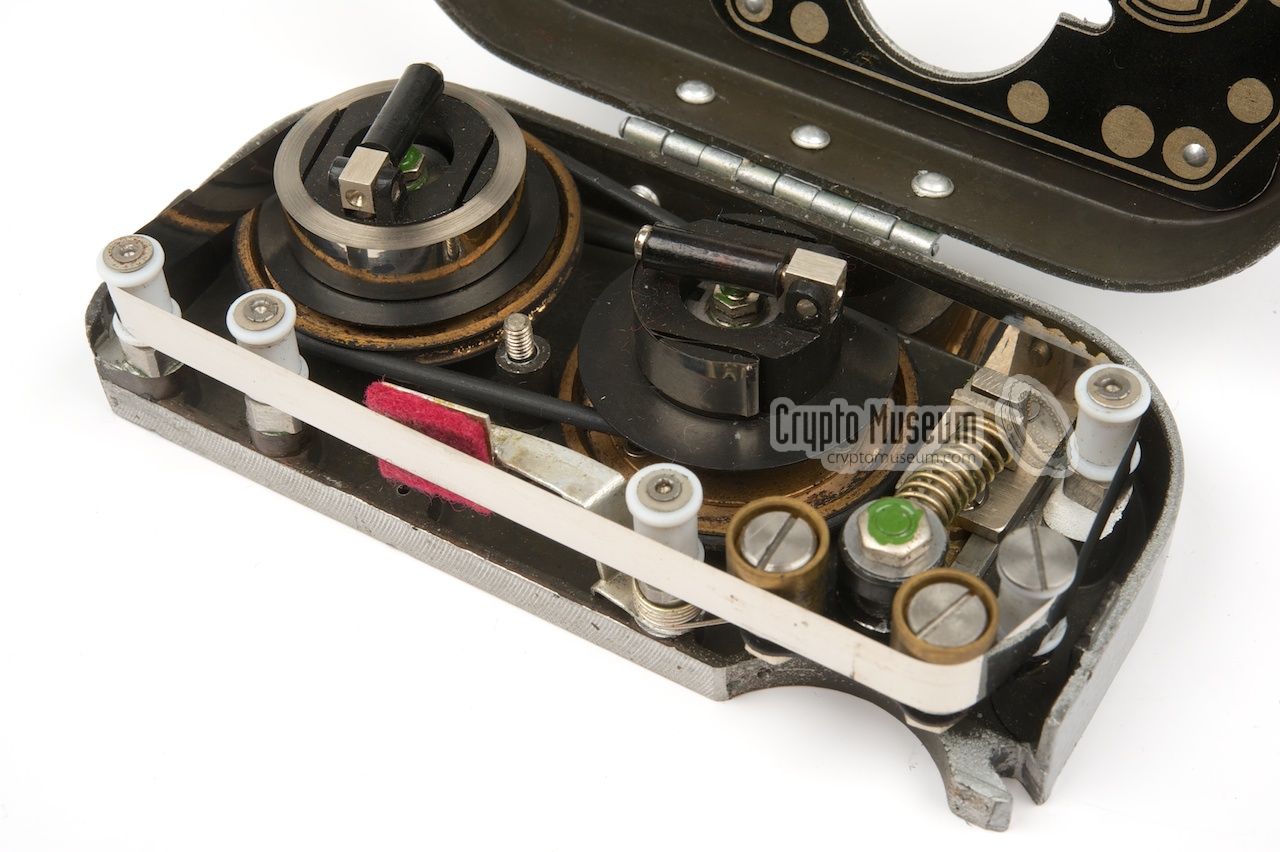
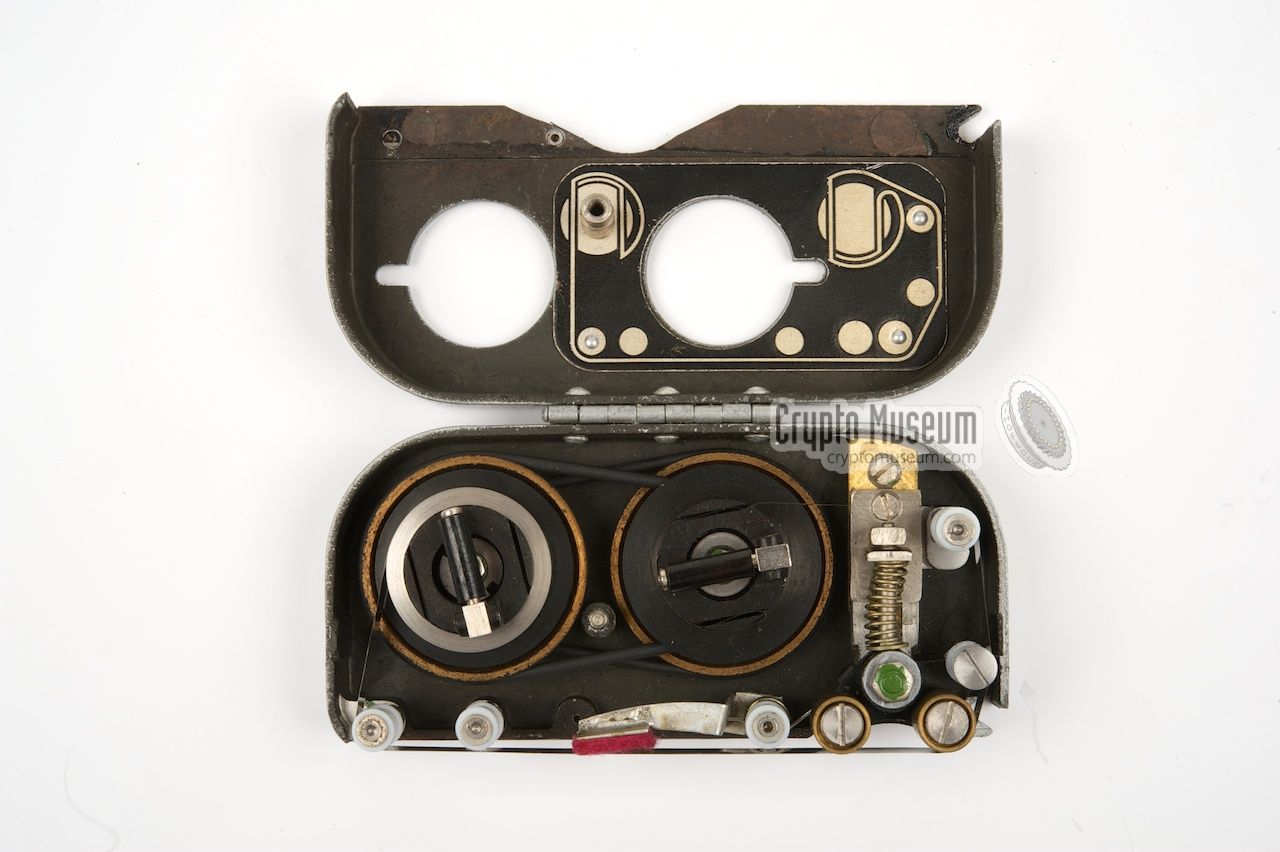
The cassette
consists of two hinged metal shells inside which the
two tape spools and some tape guides are housed. The cassette can be opened
by releasing a single screw
at the bottom. This reveals the mechanism
as shown on the right. A drawing in the lid
shows how the tape is guided.
The supply reel is at the left and the tape is led via seven tape guides
onto the pickup reel at the right. At the centre is a piece of felt (here
visible in red) that pushes the tape against the coded heads of the
encoder. During playback this felt pushes the tape against the
head of the keyer.
|
|
|
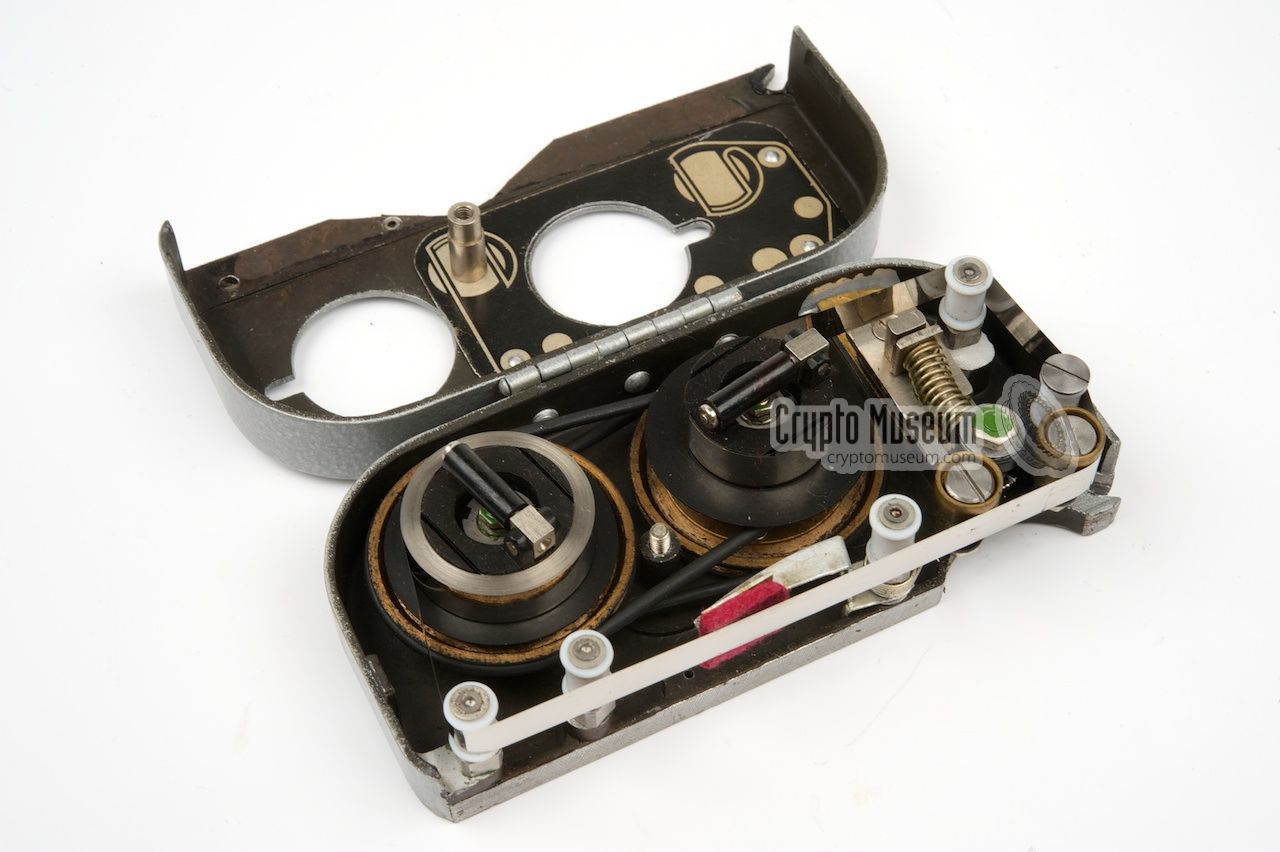
A the right hand side is the driving mechanism. The tape passes
two metal guides at the front right of the cassette with a spring-loaded
rubber pinch roller behind them. The cassette body has a circular cut-out at this
position. When the cassette is placed in the encoder, a rubber wheel
engages the tape here. It moves the tape to the right and in doing so it
pulls the tape from the supply reel.
On the transmitter, the rubber wheel of the keyer drives the tape in the
same way.
|
The two tape reels are coupled by means of
two rubber belts, each of which
drives the friction coupling of the other one. This allows the tape to be
transported in both directions simply by driving the tape either way with
a rubber wheel.
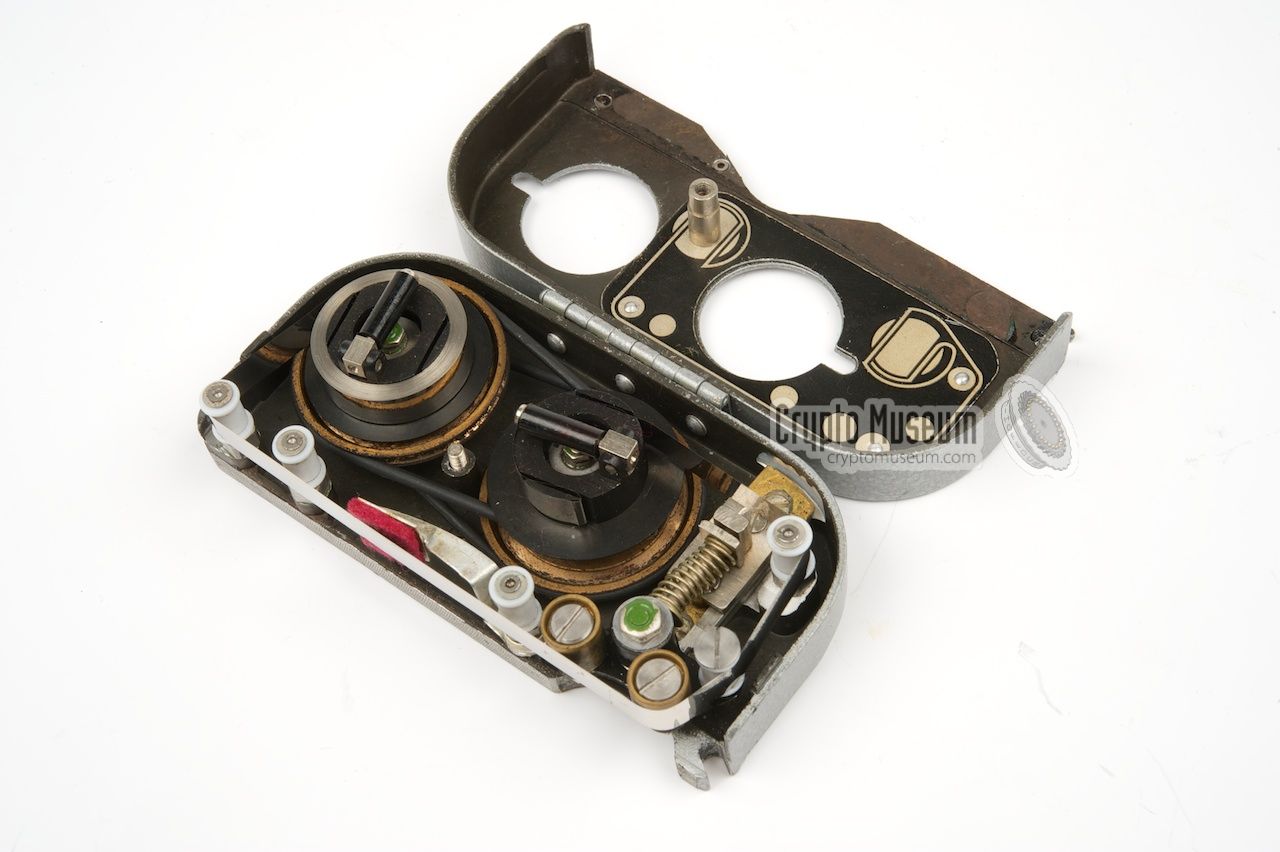
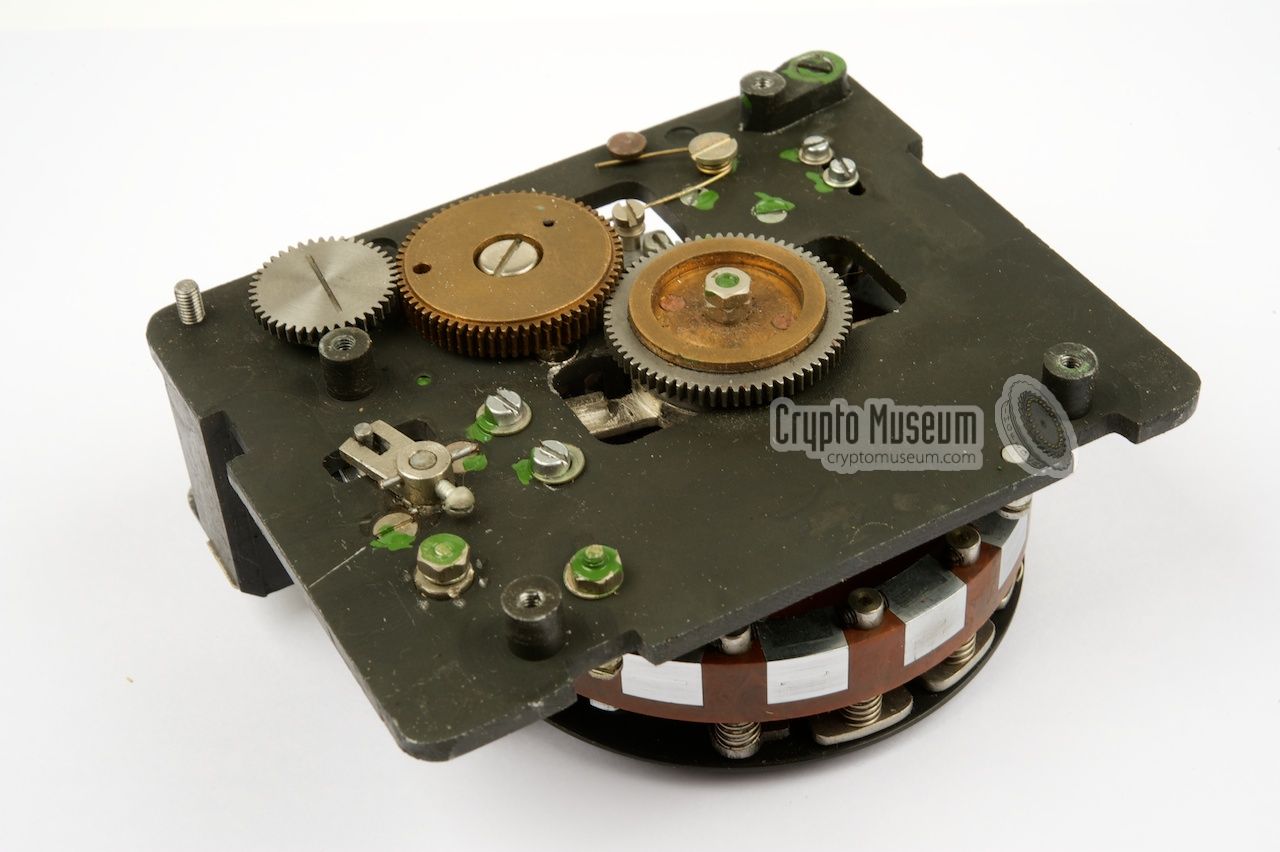
The mechanism of the encoder is much more complex, but is nevertheless
equally ingenious. The image on the right shows the interior of the encoder
after removing the two case shells.
At the heart of the device is a large brown bakelite disc that is directly
driven by the black number dial, which itself is
driven by the brown stylus.
|
|
|
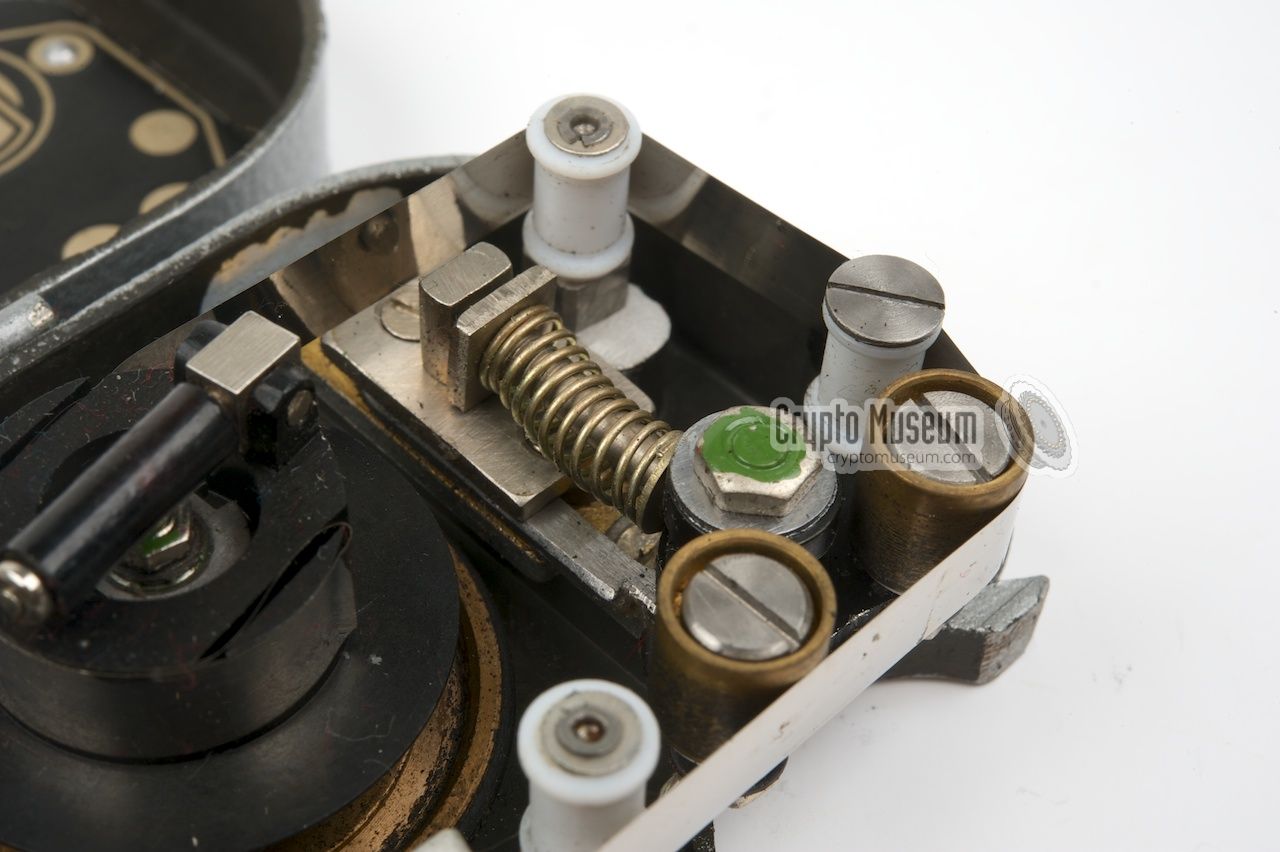
When entering numbers via the dial, the last two centimetres of the circular movement before the stop, sets a rubber drive wheel in motion. This
rubber drive wheel is just visible at the rear right corner and advances the
magnetic tape inside the cassette by by the actual width of the morse
character (max. 9 mm). This means, for example, that 5 (·····) takes less space
than 1 (·----).
A small magnet inside the encoder, clears any
previous recording by fully magnetising the tape.
|
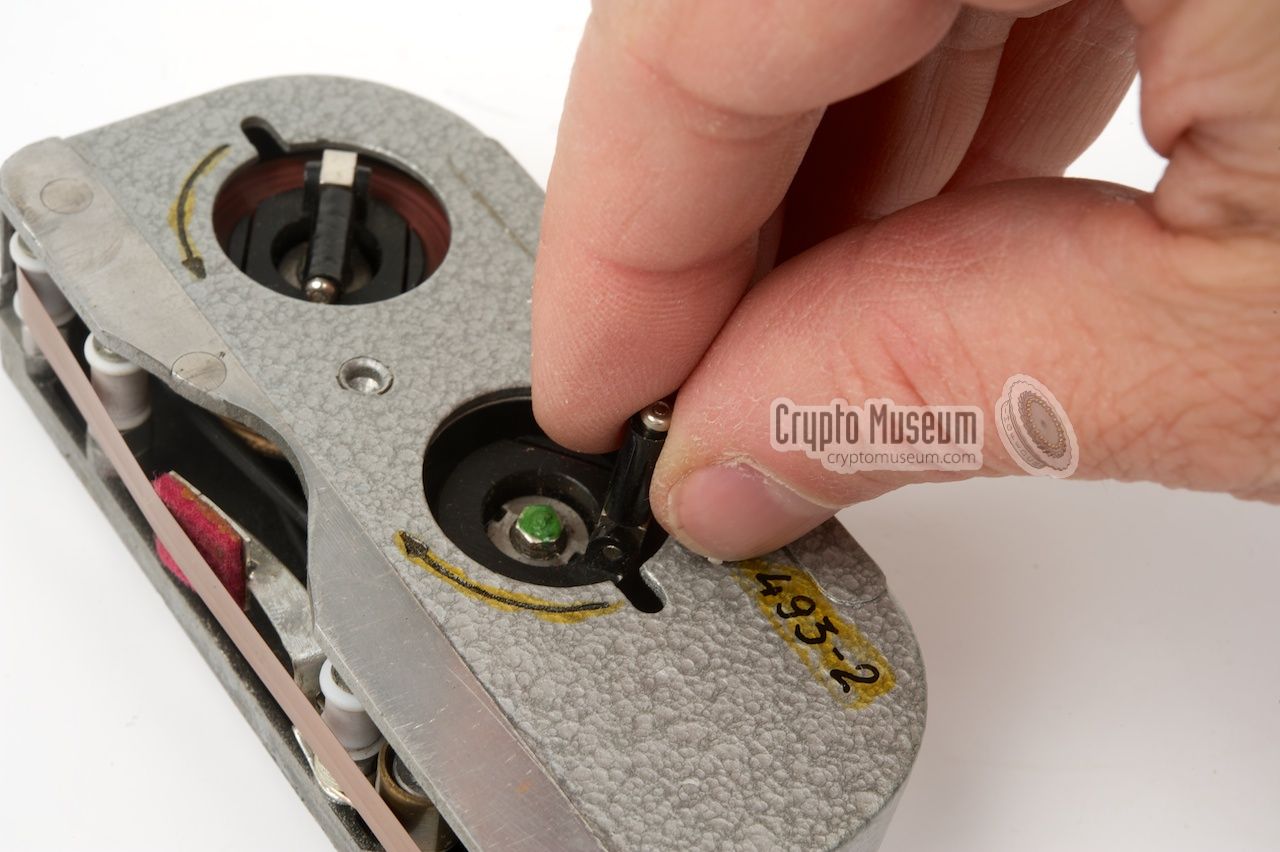
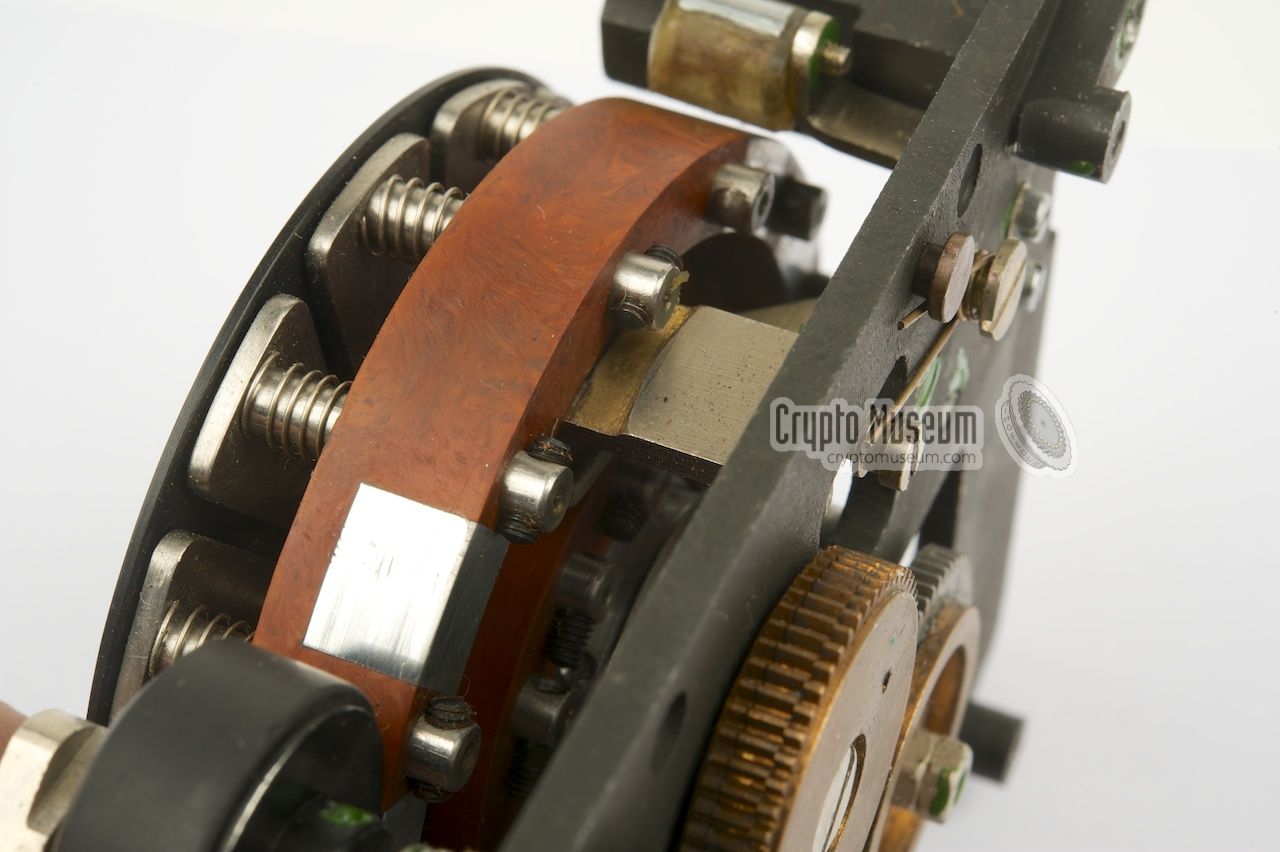
When the styles reaches the stop, the dial should not be released,
but the
stylus should instead be pressed further towards the stop,
so that the shiny metal stub (i.e. the stop) rotates its axle.
In doing so, the stop lever moves a permanent magnet against the
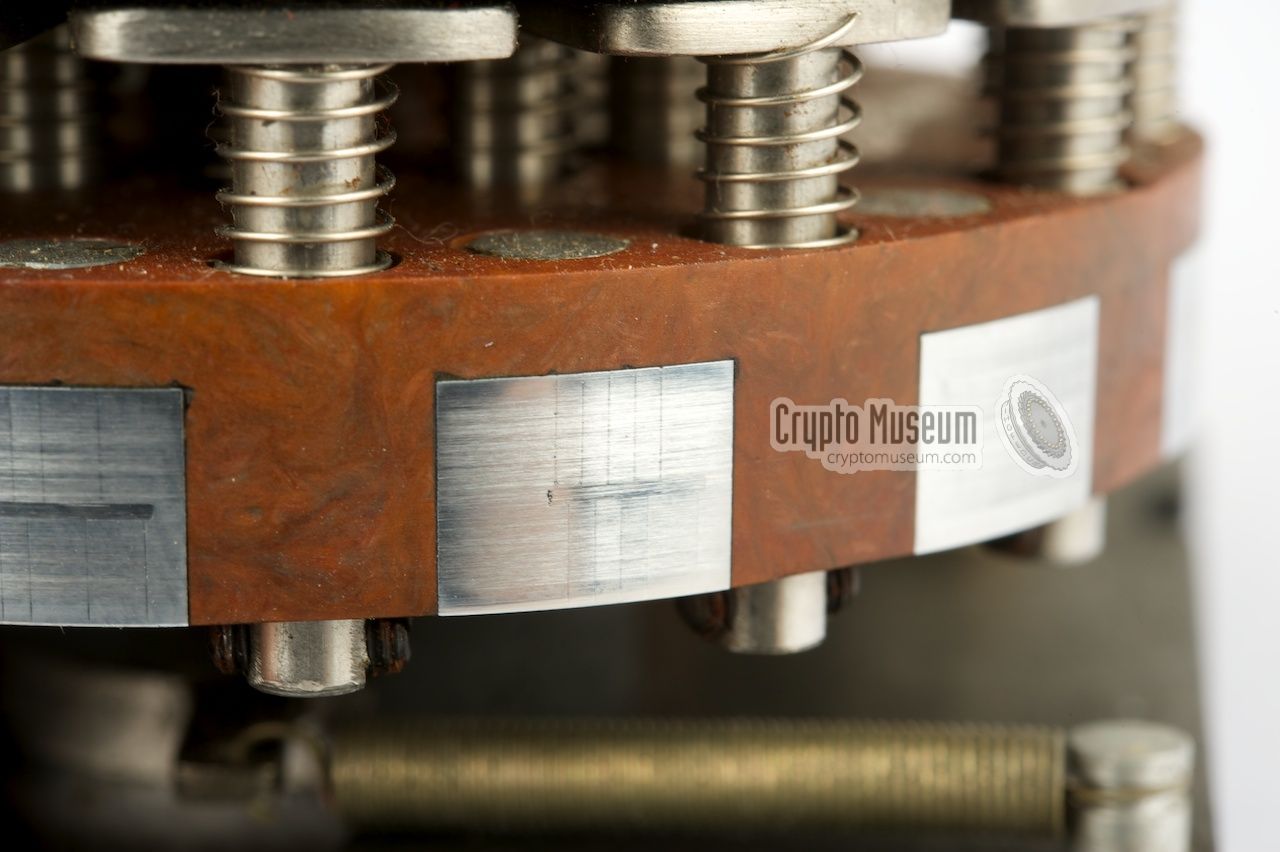
inside of the large brown bakelite disc. This magnetizes one of the 12
rectangular metal coded heads that are present at the circumference of
the disc. This action effectively writes the chosen digit onto the tape
as a series of pulses divided over two tracks: one for the ON signal
and the other one for OFF.
|
|
|
The image above shows a close-up of one of the coded heads. Click the
image to take an even closer look.
It shows that each track of the coded head is made up of several
vertical layers of magnetically conductive metal.
At the junction of two such layers, a tiny gap causes
magnetic resistance and, hence, a small disruption of the magnetic flux,
which is copied onto the tape.
|
The two tape tracks are separated by a horizontal metal layer at the centre.
When playing back the tape on the
high-speed keyer of the R-353,
the small magnetic disruptions cause small electrical pulses which,
after amplification, are used to drive a flip/flop.
The pulses from
TRACK 1 are used to set the flip/flop, whilst the pulses from TRACK 2
will reset it. This way, the morse code representation of the original
character is reconstructed.
This is further illustrated below.
The drawing above shows an enlargement of the coded head that represents
the morse character '4'. All metal parts are magnetized when the permanent
magnet inside the encoder is moved forward, but the junctions between the
layers will cause small disruptions in the magnetic field that magnetizes
the tape. In the above diagram, the upper two lines shows the pulses that
are read by the keyer from track 1 and 2 respectively. The lower line
shows the reconstructed digit.
|
|
Although the burst encoder for the R-353 stores its infomation as real
morse code
characters, there are some limitations.
Due to the width of the coded heads, the maximum length of a morse character
is limited to 9 mm.
The table below shows how the characters on the dial are translated into morse code.
It also shows how much space of the magnetic tape each character occupies.
|
| | Morse | Width | Remark |
|
|
| 1 | ·---- | 9 mm | |
| 2 | ··--- | 8 mm | |
| 3 | ···-- | 7 mm | |
| 4 | ····- | 6 mm | |
| 5 | ····· | 5 mm | |
| 6 | -···· | 6 mm | |
| 7 | --··· | 7 mm | |
| 8 | ---·· | 8 mm | |
| 9 | ----· | 9 mm | |
| ··· | ·· ·· | 5 mm | Repetition sign (ii) is used for Correction |
| 0 | - | 4 mm | Actual code (-----) doesn't fit in 9 mm, so 'T' is used instead |
| P | | 3 mm | No sign, just a pause |
|
|
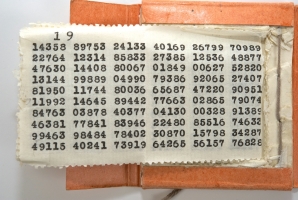
In order to repair a broken cassette, spare magnetic tape was supplied
in the so-called ZIP box
that came with the R-353 radio. The ZIP box
contains spare parts, tools and other materials for repairing the radio
and its accessories in the field. It contains approx. 100 metres of spare tape.
|
Broken tapes were never repaired or glued back together;
they were simply replaced by a fresh new contiguous piece of recording tape.
Two types of tape have been found so far.
The most common one is the shiny chromium tape shown here,
but over time some cassettes were loaded with the more common
brown ferro-based tape.
In addition to the spare tape, the ZIP box also contained a piece of
suede, used for the friction couplings, and a couple of spare rubber belts.
➤ More about the ZIP box
|
|
|
Like the R-353 radio itself, both the encoder and the cassettes
came in two different colours:
grey hamerite and green/blue hamerite. The purpose of these colours is
currently unknown, but might have been related to the actual organisation
or agency that used the R-353 spy radio sets.
In practice however, these colours were often mixed, possibly as
a result from earlier repairs and replacements. For this reason, green
burst encoders can be found with grey radios and vice versa.
The colour might also be related to the manufacturer, the production plant
or the era in which they were produced.
|
|
|
|
|
|
Any links shown in red are currently unavailable.
If you like the information on this website, why not make a donation?
© Crypto Museum. Created: Saturday 07 November 2009. Last changed: Sunday, 15 May 2022 - 10:23 CET.
|
 |

|
|
|
|


